In the world of CNC (Computer Numerical Control) machining, precision and reliability are paramount. Whether you’re a hobbyist or a professional, having the right control system can make all the difference in the quality and efficiency of your work. One of the most powerful and versatile options available today is the PoKeys57CNC. This advanced controller offers a range of features designed to improve the performance of CNC machines, including the ability to manage multiple input/output functions, integrate with Mach3, and control various machine components seamlessly.
Understanding how to effectively use the PoKeys57CNC and its features is essential for optimizing your CNC operations. In this article, we will explore the workings of the PoKeys57CNC, including its pinout, integration with Mach3, and the critical role of limit switches in ensuring smooth machine operation. Additionally, we will provide a detailed Mach3 tutorial for CNC, helping you navigate the software’s features to get the most out of your PoKeys57CNC system.
By the end of this guide, you will have a comprehensive understanding of how to maximize the potential of your PoKeys57CNC, allowing you to enhance the precision and reliability of your CNC projects. Let’s dive into the world of CNC control systems and discover how these components work together to provide a seamless machining experience.
The PoKeys57CNC – A Powerful CNC Control Solution
The PoKeys57CNC is a robust and versatile motion control device designed for use in CNC (Computer Numerical Control) applications. Manufactured by PoLabs, it offers an advanced solution for controlling CNC machines, from hobbyist setups to professional-grade systems. With its powerful features, ease of use, and compatibility with various software, the PoKeys57CNC has gained popularity among CNC enthusiasts and professionals alike.
One of the standout features of the PoKeys57CNC is its integration with Mach3, a widely-used CNC control software. Mach3 is known for its ability to control and automate complex CNC operations, from milling and turning to routing and engraving. The PoKeys57CNC acts as an interface between Mach3 and the machine’s hardware, providing the necessary communication for accurate and efficient operation. By using PoKeys57CNC with Mach3, users can take advantage of high-speed processing, enhanced precision, and greater customization options.
The PoKeys57CNC comes with a wide range of input and output capabilities, making it suitable for a variety of applications. These include digital inputs and outputs, analog inputs, and relay outputs. The controller is equipped with 57 pins, which are assigned to different functions, such as controlling stepper motors, reading limit switches, and handling other peripherals. This flexibility allows users to configure the PoKeys57CNC for specific machine setups, ensuring that all components work harmoniously to achieve the desired results.
In addition to its hardware features, the PoKeys57CNC also supports a variety of communication protocols, such as USB and Ethernet, enabling seamless connection with other devices. This makes the controller highly adaptable and future-proof, as users can easily integrate it with other CNC equipment and software.
The versatility of the PoKeys57CNC extends to its compatibility with a wide range of CNC machines, including milling machines, lathes, routers, and laser cutters. This flexibility makes it an ideal choice for individuals and businesses looking for a reliable control solution that can handle multiple types of machining operations.
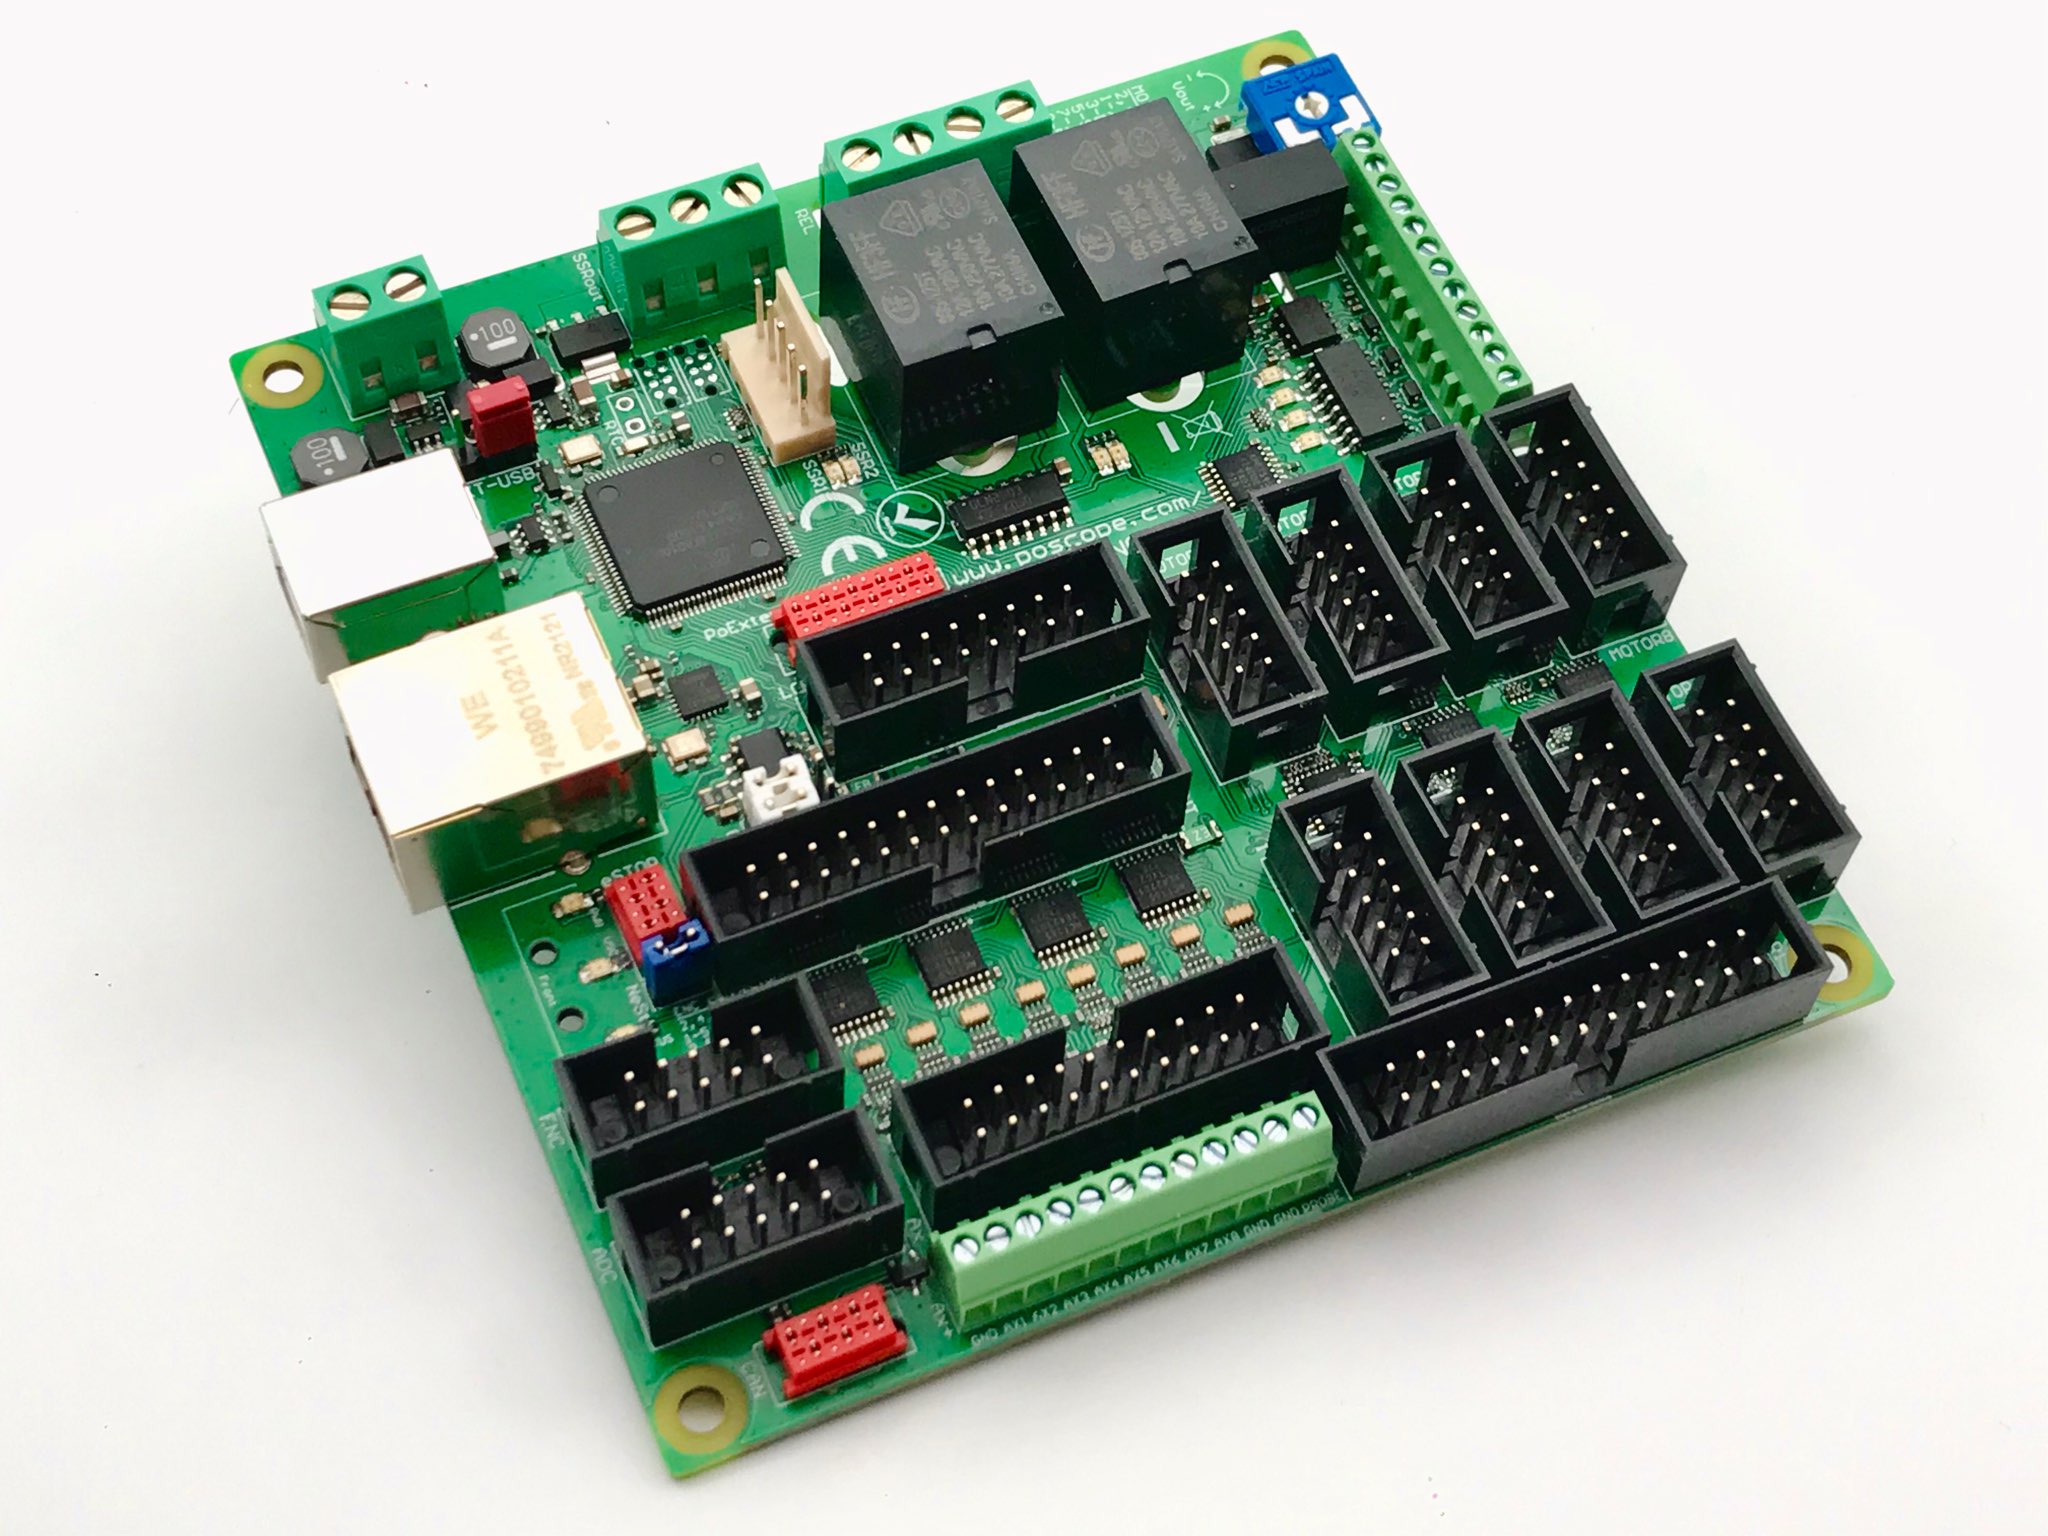
Whether you’re building a custom CNC machine or upgrading an existing setup, the PoKeys57CNC offers an excellent combination of power, flexibility, and ease of use. In the next chapter, we’ll delve deeper into the PoKeys57CNC pinout, exploring how the controller’s pins are configured to interact with various machine components. Understanding the pinout is key to maximizing the potential of the PoKeys57CNC and ensuring your CNC system functions as intended.
Understanding the PoKeys57CNC Pinout
The PoKeys57CNC is a highly customizable and flexible controller, and its pinout plays a crucial role in its functionality. Each pin on the PoKeys57CNC is assigned to a specific task, whether it’s controlling motors, reading sensors, or interacting with other machine components. Understanding the pinout of the PoKeys57CNC is vital for properly configuring your system and ensuring that all components work together seamlessly.
The PoKeys57CNC pinout includes 57 pins, which are organized into various groups based on their function. These include digital inputs, digital outputs, analog inputs, relay outputs, and other specialized functions. By understanding how each pin works, you can easily set up and wire your CNC machine, connecting everything from stepper motors to limit switches and beyond.
At the heart of the PoKeys57CNC pinout are the digital input and output pins. Digital inputs are used to read signals from external devices, such as limit switches or proximity sensors, while digital outputs control devices like stepper motors, solenoids, and relays. These pins are critical for the operation of your CNC machine, as they facilitate the flow of data between the controller and the machine components. For example, digital input pins might receive signals from a limit switch, telling the controller to stop the machine when it reaches a certain position. Digital output pins, on the other hand, could be used to control a stepper motor’s movement, directing the machine’s actions based on the input signals received.
The PoKeys57CNC pinout also includes analog inputs, which allow the controller to read varying voltage levels. These inputs are useful for applications that require precise control, such as reading the position of a potentiometer or controlling a variable speed motor. The analog inputs are often used in conjunction with other CNC components, like a spindle controller, to fine-tune the machine’s operation.
Another important feature of the PoKeys57CNC pinout is the relay outputs. These outputs are used to control high-power devices, such as lights, fans, or cooling systems. Relay outputs are particularly useful in automated CNC systems, where the machine needs to control additional peripheral devices in sync with the main operations.
To make the most of your PoKeys57CNC, it’s essential to understand the pinout configuration and how to wire the pins correctly. Each pin is clearly labeled, and the PoKeys software provides detailed instructions on how to assign functions to each pin. This ensures that you can tailor the PoKeys57CNC to meet your specific needs, whether you’re using it in a small desktop CNC machine or a large industrial setup.

In addition to the basic pinout, the PoKeys57CNC also offers several advanced features that can be configured using the pins. For example, you can set up homing cycles, limit switches, and even manage multiple axes of motion, all by assigning specific functions to the relevant pins. Understanding the pinout allows you to unlock the full potential of the PoKeys57CNC, ensuring that your CNC system runs smoothly and efficiently.
Now that we’ve covered the PoKeys57CNC pinout, it’s time to explore the role of limit switches in CNC systems. Limit switches are a critical component in ensuring that your machine operates safely and efficiently, and in the next chapter, we’ll delve into how they integrate with Mach3 to prevent mechanical errors.
The Role of Mach3 Limit Switches in CNC Safety
In any CNC system, precision and safety are paramount, and limit switches play a crucial role in ensuring both. A limit switch is a mechanical device designed to limit the movement of a CNC machine to prevent it from exceeding its designated travel limits, thereby protecting both the machine and the user. When integrated with Mach3, limit switches enhance the safety of the system by preventing physical damage to the machine’s components, avoiding software errors, and ensuring that the machine operates within its programmed boundaries.
Mach3, a widely-used CNC control software, allows users to configure and manage limit switches to help control the machine’s movement. The software works seamlessly with PoKeys57CNC controllers, such as the PoKeys57CNC, which are capable of handling digital inputs from limit switches and responding accordingly. By setting up limit switches in Mach3, users can prevent the machine from running into hard stops or colliding with other parts, which could cause serious damage to the CNC system.
Limit switches are typically installed at the ends of each axis of movement—X, Y, and Z—and are activated when the machine reaches a predetermined limit. When a limit switch is triggered, it sends a signal to Mach3, which then halts the machine’s motion, preventing any further movement in that direction. This safety mechanism is especially important in scenarios where the machine may otherwise continue moving past its travel limits, potentially leading to mechanical failure or system malfunction. The integration of limit switches with Mach3 ensures that the machine only operates within safe, predefined boundaries, providing a safeguard against errors and protecting the hardware.
In Mach3, limit switches are typically configured through the software’s settings interface. Users can assign specific inputs (such as pins on the PoKeys57CNC) to limit switches, and Mach3 will automatically recognize these inputs during operation. Once configured, the limit switches provide a feedback loop that allows the software to stop the machine in case of an error. This can be critical in preventing damage to both the CNC machine and the workpiece.
Mach3 also allows users to set up soft limits, which are virtual boundaries within the software that work in conjunction with physical limit switches. Soft limits act as an additional layer of safety, ensuring that the machine does not attempt to go beyond a safe working area, even if the limit switch is malfunctioning or improperly configured. By using both hard and soft limits in tandem, you can maximize the safety and efficiency of your CNC system.
Another essential function of limit switches in Mach3 is their role in homing the machine. Homing refers to the process of moving the machine to a known reference point at the beginning of each operation. Limit switches provide the feedback needed for homing cycles, allowing the system to find its “home” position, typically at one of the machine’s travel limits. By configuring homing in Mach3, users ensure that the machine starts from a consistent and accurate position, which is essential for precision machining.
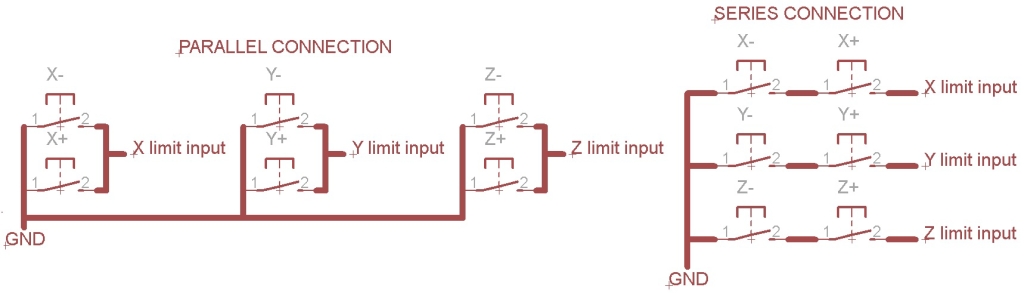
Additionally, Mach3 gives users the flexibility to configure different types of limit switches, such as normally open (NO) or normally closed (NC) types, depending on the specific needs of the system. This flexibility allows for fine-tuning the setup to match the requirements of the machine and the user’s workflow.
Overall, Mach3 limit switches are an integral part of CNC safety. By preventing over-travel and collisions, they protect both the machine and its operator. Understanding how to properly configure and use limit switches in Mach3 is essential for ensuring that your CNC system operates smoothly and safely. In the next chapter, we will dive into a Mach3 tutorial for CNC, providing a step-by-step guide on how to set up and use Mach3 software for efficient CNC operation, including the integration of limit switches and other components like the PoKeys57CNC.
Mach3 Tutorial CNC – Getting the Most Out of Your System
Mach3 is one of the most popular CNC control software programs available today. Known for its flexibility, customizability, and user-friendly interface, Mach3 allows CNC operators to control their machines with precision and ease. In this chapter, we’ll provide a detailed Mach3 tutorial CNC, guiding you through the essential steps of setting up the software, configuring inputs and outputs, and integrating your PoKeys57CNC controller to ensure everything works seamlessly together.
Installing Mach3 and Connecting Your PoKeys57CNC
The first step in using Mach3 with your CNC machine is to install the software. Download the latest version of Mach3 from the official website and follow the installation instructions. Once the software is installed, you’ll need to connect your PoKeys57CNC controller to your computer via USB or Ethernet, depending on the connection type supported by your controller.
When your PoKeys57CNC is connected, open Mach3 and go to the “Config” menu. Select “Ports and Pins” to configure the communication settings between Mach3 and your controller. Here, you will need to assign the correct port and ensure that Mach3 is properly detecting your PoKeys57CNC device. If everything is connected correctly, Mach3 will recognize the controller, and you’ll be ready to proceed.
Configuring Inputs and Outputs
One of the key features of Mach3 is its ability to configure inputs and outputs to control various aspects of the CNC machine. In this step, you will configure the inputs for your limit switches, home switches, and other devices, as well as the outputs for controlling stepper motors and other peripherals.
To configure inputs, navigate to the “Ports and Pins” section within the “Config” menu. Here, you can assign specific pins from your PoKeys57CNC controller to different functions, such as limit switches and home switches. For instance, if you have connected a limit switch to pin 10 on your PoKeys57CNC, you would assign pin 10 to the corresponding input function in Mach3.
For PoKeys57CNC users, the flexibility of the PoKeys57CNC pinout allows for a variety of configurations. You can assign digital inputs, analog inputs, or relay outputs to specific pins, depending on the setup of your machine. Once the inputs are configured, Mach3 will be able to monitor them during machine operation, triggering actions based on the signals it receives.
Similarly, you can configure digital and relay outputs to control devices like stepper motors or cooling fans. Navigate to the “Output Pins” section to assign the relevant pins from your PoKeys57CNC to control your motors, solenoids, or other accessories. Ensure that the outputs are configured to match the wiring of your CNC machine to avoid any operational issues.
Setting Up Limit Switches in Mach3
As we discussed in the previous chapter, limit switches are essential for CNC safety, preventing the machine from over-traveling and causing damage. In this step, we’ll walk you through setting up Mach3 limit switches.
In Mach3, limit switches are typically configured as digital inputs. To set up limit switches, go to the “Ports and Pins” section and select the “Input Signals” tab. Here, you can assign your limit switches to the corresponding inputs on your PoKeys57CNC. For example, if you’ve connected a limit switch to pin 10, you would assign pin 10 as the limit switch input in Mach3.
You should also configure the behavior of the limit switches. Mach3 offers several options for how the system should respond when a limit switch is triggered. The default action is to stop the machine, but you can customize this to fit your needs. For example, you might want the machine to trigger a homing cycle when a limit switch is activated or automatically pause operations until the issue is resolved.
Additionally, you can configure soft limits in Mach3 to provide an extra layer of protection. Soft limits define virtual boundaries within the software that complement the physical limit switches. These virtual limits are programmed based on the machine’s maximum travel distances, preventing the machine from attempting to move beyond its safe working area.
Configuring Homing and Mach3 Movement Settings
Homing is a crucial step in CNC operations, ensuring that the machine starts each job from a known position. This is where limit switches are particularly useful, as they help the system find the “home” position. In Mach3, you can configure homing cycles to automatically move the machine to its home position using the limit switches.
To set up homing, go to the “Homing/Limits” tab in the “Config” menu. Here, you can assign the relevant pins on your PoKeys57CNC to the home switches for each axis (X, Y, and Z). Once the machine reaches the home position, the limit switches will trigger, sending a signal to Mach3 that tells the software the machine is at its home point.
After homing, you can configure Mach3 to automatically set the machine’s position to zero, enabling precise and repeatable operations. This feature is essential for tasks like milling, where starting from a known position ensures that every cut is accurate and consistent.
Fine-Tuning and Testing
Once all the configurations are in place, it’s time to test your system. Run a series of test moves to ensure that your PoKeys57CNC, limit switches, and Mach3 settings are working correctly. Verify that the machine responds as expected when limit switches are triggered, and that the stepper motors, spindles, and other peripherals are functioning as intended.
Testing is essential to ensure that all safety features, such as limit switches, soft limits, and homing cycles, are functioning correctly. Take your time to adjust settings as needed and test each component before beginning actual machining tasks.
By following this Mach3 tutorial CNC, you can set up and configure your PoKeys57CNC and integrate it seamlessly with Mach3 to create a powerful and precise CNC control system. With the right configuration, you’ll be able to maximize the performance of your CNC machine, ensuring smooth operation, safety, and accuracy. Whether you’re using limit switches to prevent over-travel or fine-tuning movement settings for optimal results, Mach3 offers the flexibility and customization needed for both hobbyists and professionals.
A Comprehensive Guide to Stepper Motor Drivers: Function, Wiring, and Integration
Conclusion
In conclusion, the PoKeys57CNC is a powerful and flexible controller that can significantly enhance the functionality and precision of any CNC system. Whether you are a hobbyist looking to build your first CNC machine or a professional upgrading your existing setup, understanding how to properly integrate the PoKeys57CNC with Mach3 is essential for achieving optimal performance. From configuring the PoKeys57CNC pinout to setting up Mach3 limit switches and learning how to navigate the Mach3 tutorial for CNC, this guide has covered the key components that ensure a smooth and efficient CNC operation.
The PoKeys57CNC’s versatility allows users to control various aspects of their CNC systems, from managing stepper motors to monitoring inputs like limit switches. Through its seamless integration with Mach3, users can customize their CNC machines with precision and flexibility, optimizing their operations for different machining tasks. The ability to configure limit switches and utilize soft limits further enhances safety, preventing machine over-travel and potential damage, making CNC operations safer and more reliable.
By following the steps outlined in this article, you now have a thorough understanding of how to configure and use the PoKeys57CNC in conjunction with Mach3. From setting up inputs and outputs to fine-tuning your machine’s movement, the process becomes intuitive, ensuring that your CNC machine operates with greater accuracy and efficiency.
As you continue to explore the full capabilities of the PoKeys57CNC and Mach3, you will gain even more control over your CNC machine, enabling you to tackle more complex and precise projects with confidence. Whether you are milling, engraving, or cutting, the combination of the PoKeys57CNC controller and Mach3 software will provide you with the tools you need to succeed. By mastering these components, you are well on your way to achieving professional-quality results in your CNC endeavors.